
In the beginning of an investigation there are usually way more questions than answers. But when the fuel tank on the Challenger exploded nearly 35 years ago, what NASA and millions of people watching on television wanted to know was, “Why did it happen?”
The space shuttle was one of the most complex machines ever built. It had about 2.5 million parts and between NASA employees, contractors, and suppliers there were about 50,000 people involved with each flight. Major problems, whether at NASA or in your operations, require an in-depth understanding that must take place before the solutions.
Regardless of the type or complexity of a problem, there are three basic steps to systematically work through an issue:
- a complete definition,
- a thorough analysis to determine how and why it occurred, and
- specific actions to prevent similar issues going forward.
On complex or confusing problems people often ask, “Where do I start?”
My answer is, “Step 1. Then Step 2 and 3.”
Starting with Limited Information
The first step is the problem definition. A problem definition should not be a wordy statement or just a single effect. Because problems have parts, these four questions provide a framework for a complete problem definition:
- What is the problem?
- When did it happen?
- Where did it happen?
- How was each the overall goals affected?
Immediately after the Challenger incident occurred, when information was limited, a first pass of the problem outline might look like this:
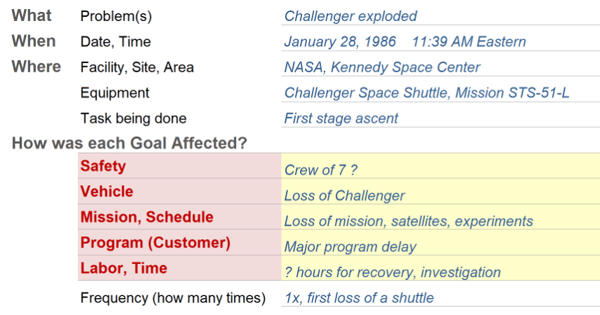
When the explosion happened, the first priority was the well-being of the crew. Initially, their condition was unknown, so a question mark was used on the safety line. Tragically, it changed to the Loss of 7 crew as more information was uncovered. Even if information is missing, capture what you know about the problem and use a question mark to indicate unknowns. Specifics can be added as they become available. This video explains how the problem outline for the Challenger begins basic, then expands as detail is added.
Analyzing with a Timeline and Cause and Effect
Once the problem has been defined, the second step is analysis. Piecing together the details of an issue into a coherent explanation is the purpose of the analysis. Two tools we use together are a timeline and a Cause Map™ diagram. Understanding the chronology of an incident is important, but it is cause-and-effect that reveals the different ways a problem can be prevented. The timeline is when things happened. The Cause Map diagram is why they happened.
At the beginning of a complex investigation like the Challenger, all the cause-and-effect relationships will not be clear. But that’s OK. Start with what you do know and then add detail as information becomes available. Here is a first pass at a Cause Map diagram for the Challenger disaster. It’s accurate, but incomplete.
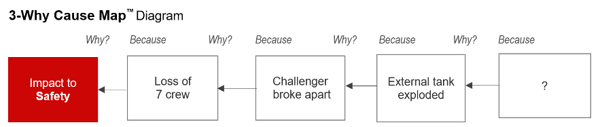
It starts on the left with the impact to the safety goal and reads to the right one cause-and-effect relationship at a time. For each connector arrow ask, “Why did this effect happen?” The loss of the seven crew was because the Challenger broke apart when the external tank exploded. Initially, why the tank exploded was unknown, which is why there is a question mark in the cause box.
When causes are unknown, a timeline is an ideal way to understand what happened just before an effect occurred. In the case of the Challenger, it was important to know what happened before the tank exploded. What was normal and what was different?
Because information may be limited, a timeline can also begin with only a couple of entries. More information can be added as the digging progresses. The timeline below is our three-column format (date, time and description) that reads down the page.

A next version of the timeline can provide background information leading up to the launch and additional details gathered from evidence. Fortunately, to ensure this type of information was available to evaluate each flight, NASA had dozens of fixed cameras at the launch pad, as well as tracking cameras at various distances from the pad and along the coastline to follow the shuttle during its ascent.
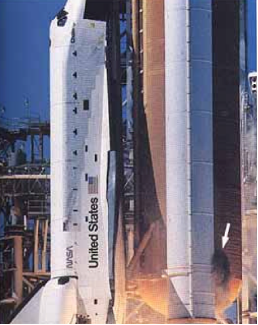
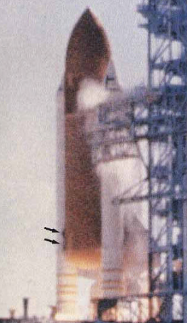
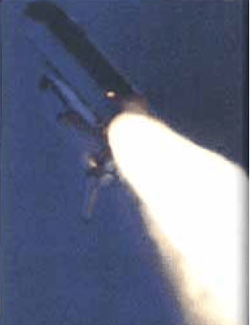
By reviewing that footage, a much more detailed timeline with corresponding images can be made. This is how the investigators figured out what led to the tank explosion. The timeline can expand only when more evidence is collected. For example, these photos from a ground tracking camera show the growing plume impinging on the external tank. That visual evidence was crucial for better understanding what happened and knowing where to gather additional evidence. The image below shows how the timeline expands accordingly.
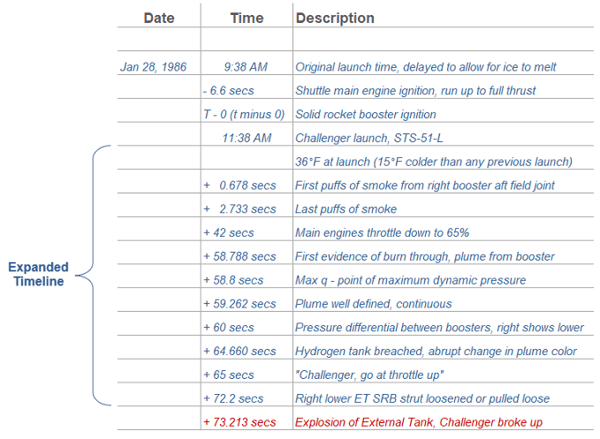
Some of the times above are in thousandths of a second because that level of detail was needed to differentiate images. Not every timeline needs that type of granularity. It depends on the issue being investigated.
Expanding the Cause-and-Effect Analysis
With detail from the timeline and inspection of the recovered boosters, specific cause-and-effect relationships and evidence can be added to the Cause Map diagram. The image below gives you a snapshot of a 5-Why and 20-Why for the Challenger disaster. (Click on the thumbnail below to download the 4-page PDF.) The colors of the cause boxes on the basic analysis show where they are in the more detailed one.
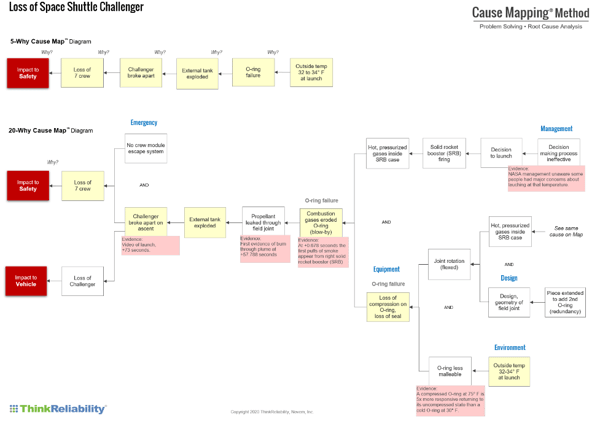
You may be asking yourself why would you build a Map to that level of detail? Failing to understand the cause-and-effect relationships within a problem to a sufficient level of detail is how organizations mistakenly arrive at generic categories such as human error, equipment failure, procedure not followed and management systems less than adequate. Action items need to make specific reductions in risk, which requires the analysis to be specific. The level of the analysis depends on the magnitude of the problem as defined in step 1. Detail only needs to be added to those problems that an organization wants to thoroughly understand and prevent.
Finding Solutions
The third step of problem solving is solutions. Some organizations operate on the premise that an incident has only one or two causes. That approach artificially restricts both the analysis and the solution set. It stifles people’s insight and information about the problem and their ideas about how it can be prevented.
The table below shows five different solutions from the Challenger that were intended to prevent similar issues in the future. The numbers are not priority; they’re just used for this summary list.
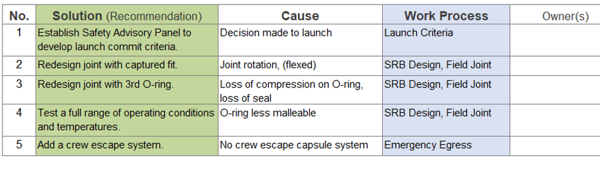
All five of these control specific causes on the larger Cause Map diagram. Solutions on a Cause Map diagram can be applied to any one of the causes. This is one of the advantages of the method. As you reveal more causes, more solution options became available. This is one of the benefits of learning how to dig into a problem. These five solutions can’t be found on the 3-Why. Although the basic analysis is accurate and fact-based, it’s not detailed enough to uncover these action items.
Small problems need a little digging, and big problems like the Challenger need a lot more. But the thinking is the same. Frontline, technical leads, supervisors and managers can all learn the same principled-approach to cause-and-effect thinking—only the level of detail varies.
For more information about analyzing the loss of the Challenger, to understand how the same approach can be applied to your problems check out one of our other resources on the subject:

For more in-depth instruction on using the Cause Mapping® method, register for one of our upcoming short courses or workshops, or attend a free webinar. See the full schedule here.


